This was a two-part project. Part 1 was the rear mud guards while Part 2 was the front. Since the Narboza Sienna has running boards, I challenged the assumption that you cannot have both running boards and front mud guards.
Back to Main Page (the main page includes a link to send me a comment)
Level of Difficulty: Moderate for rear, easy for front
Tools: #1 Phillips screwdriver, nibbler, scissors, carpet knife, flat file, Vice Grips, drill, 10mm socket and ratchet, high-speed rotary tool
Source: TRDparts4U, Advance Discount Auto Parts
Cost:
TRDparts4U = $75.90
(all four, painted)
Dealer Invoice = $77.00 (all four, unpainted)
Dealer MSRP = $110.00 (all four, unpainted)
Basic mud flaps = $8.95
Time: 8 hours
Discussion:
Even though we did not order them, Southeast Toyota (SET) was kind enough to mount rear mud guards to the Narboza Sienna. That made things easy for me to get the planning correct. SET's kind gift of the free mud guards showed that they were basically ineffective at keeping road debris off the rear fascia of the van. My solution is to make the mud guards "longer" with some integrated add-on mud flaps in order to block more debris kicked up by the rear tires. I wanted them to look good too. The closer to a stock look that I could get, the better. To give you an idea of what I mean, here are before and after photos of the regular black and my modified painted mud guards.
You can have your own opinion, but I think the new version looks good. I expect the business side of these things to get trashed, and to keep that trash off the rest of the paint job. How did I do this? Here are my steps.
| 1. Make a template. Using a blue file folder, I constructed a template. The mud guard is about two inches below the rear fascia, so I chose 1-3/4 inches as the length of the extension to make them look balanced. I doubled checked that they would function correctly as mud flaps by holding a folding ruler on the ground at the back of the tire to check the line with the rear fascia. |
|
| 2. Here is a recreation of my alignment/length check to ensure I was actually making things better. | Coming... |
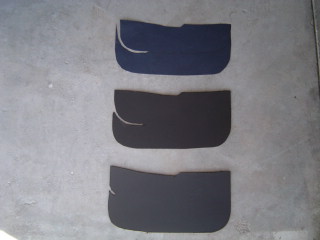
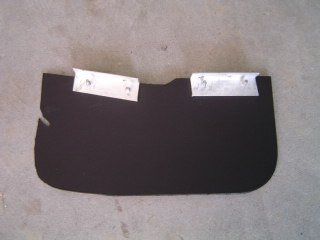
| 3. Cut out the template, transfer the shape to the mud flap material, then cut out the mud flap. Here is a picture of the paper template (top), my first effort at a mud flap (middle), and the final version (bottom). The notch is required to accommodate the shape of the factory flap as it tries to follow the design line of the fender well so the mud guard looks good from the side. I made the change in the notch for two reasons. The first was aesthetic. Cutting the thick plastic is not easy, and the rough gap due to my poorly-cut mud flap was very visible when looked at from behind. The second was functional. I was concerned that the unsupported flap would bend over time and look bad. This change meant that I now needed to notch the mud guard itself. |
 |
| 4. Here is my starting product. These are the painted parts from TRDparts4U. The right side part is smaller to permit clearance around the exhaust pipe. | 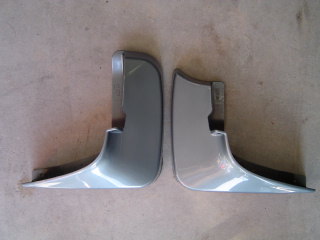 |
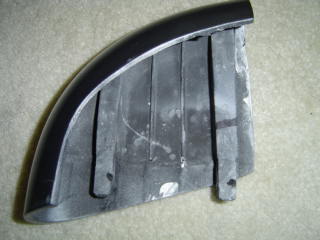
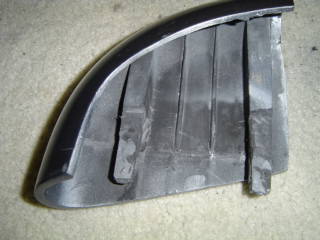
| 5. Here is the right mud guard prepared for notching with the nibbler tool. (I forgot to take a picture of the left one.) |  |
| 6. Here is the left mud guard with its notch cut and the other standing by for destruction. The mud flap portion with this design is braced across its entire width by the bottom of the mud guard. Between that and the aluminum bracket, these things are not coming off under normal conditions. | 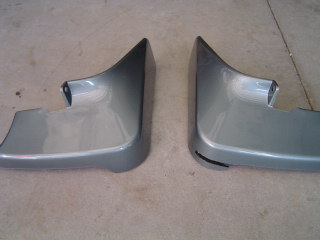 |
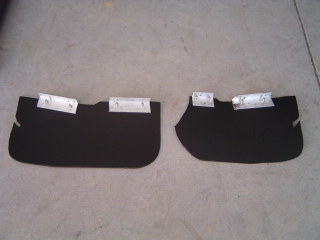
| 7. With the mud guards notched and the mud flaps cut, I now needed to attach the two. My method involved aluminum angle and sheet metal screws, but other methods are possible. This picture shows the brackets attached to the tops of the mud flaps. The brackets will be attached inside the mud guard cavity and cannot be seen. Before installation, I sprayed things with some undercoat to reduce corrosion. I must admit that I got the inside radius wrong on the right side mud flap. I should have used a mud guard corner to trace the curve, but I did it freehand and got it wrong. Oh well. Aligning and drilling the brackets on these things was tedious. |
  |
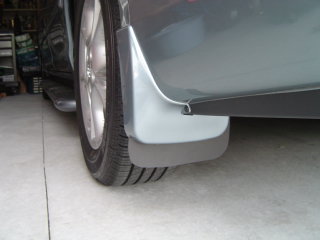
| 8. Here is the product before installation. That bad radius looks really out of proportion, but I will live with it. | 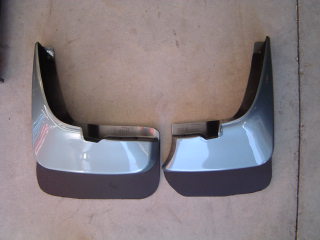 |
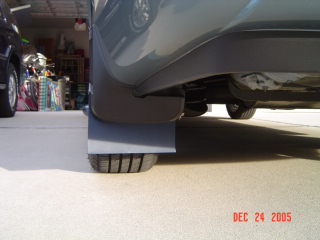
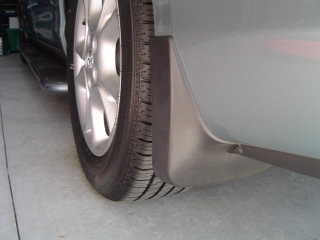
| 9. Here is what they look like on the van from the back. I think they look better than the stock part. |
 |
| 10. Here is what they look like from the front. The sheet metal screws are fairly innocuous, especially with the undercoat spray. |
  |
Was it worth it? Immediately after finishing these, my answer was no. After reconsideration, I think the answer is yes.
Lessons:
Time: 2 hours
Discussion:
As you can tell of Step Nine above, our 2006 Sienna Limited came with Southeast Toyota (SET) running boards installed. These are not factory running boards. If they had been properly designed, you should not be able to install front mud guards with running boards. I am happy to say that that is not true in all circumstances.
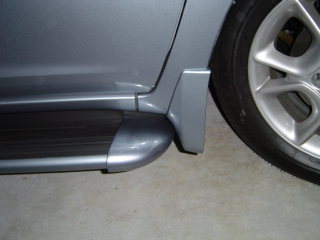
I think I like it, but it is a compromise. I can certainly live with it, but I would much prefer an integrated, blended solution. This overall modification was much easier than the rear mud guards. Looking at the coverage of the stock front mud guard, I am initially going without an additional mud flap like what I added to the rear. I will keep an eye on the road trash that gets thrown up to see if any length extension is warranted.
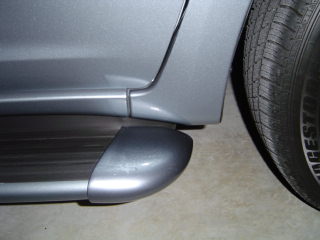
The problem I had to solve was that the resin end cap on the front end of the running board was too far forward and interfered with the mud guard installation. My solution was to modify the resin end cap mounts to slide it further back on the extruded aluminum part of the running board.
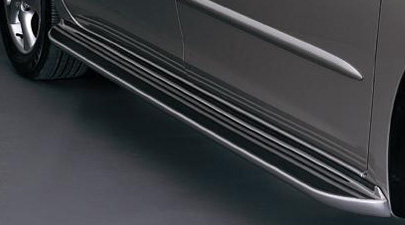
One comment about the running boards we received from SET -- this installation would not have been possible if this type of running board had been installed. The pictures came from Toyota's website. This is what we thought we were getting in the way of running boards when we ordered them. I like the smooth blended solution at the wheel wells rather than the "pod" version we got. A misrepresentation? Dunno. I guess I should have asked more questions when purchasing the van.

I did not jack up the van up to do this mod, but I did turn the wheels to gain some wrench clearance. Here is how I made the room to fit the mud guard.
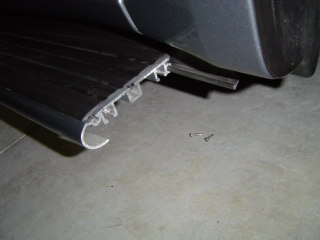
| 11. The first step for this modification is to look underneath the resin cap on the front of the running board. This is a picture looking directly up at the bottom of the front end of the running board. The front of the vehicle is to the left in this picture. The running boards that we got are the classic extruded aluminum with resin end caps. The two resin prongs are inserted in the running board channels and held with two self-drilling metal screws. Remove these with a #1 Phillips screwdriver to allow you to slide the resin cap off the end of the running board. (See the note about screws at the end of this series.) |
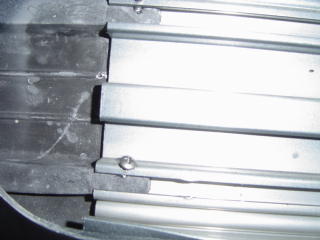 |
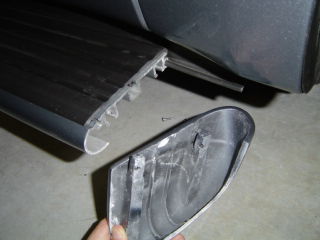
| 12. This is what you see. The rounded portion on the outside is the only part of the running board itself that is painted. The resin cap has two prongs that slide into the outside channels. The black step tread slides into the top center and outside channels. Customizing these running boards to match the van is this very easy and requires little painting. The black rubber gasket you see just above the end cap in the second photo is slid into the channel on the back side of the running board and seals the inboard side. The upper edge of this gasket rests against the vehicle's lower body flange. This type of installation allows for some variability during installation and promotes speed, which would reduce SET's overhead and maximize profit. |
  |
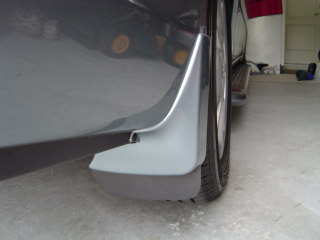
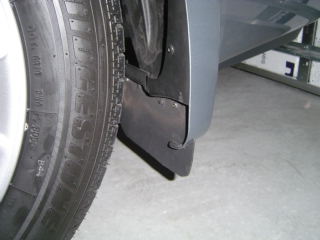
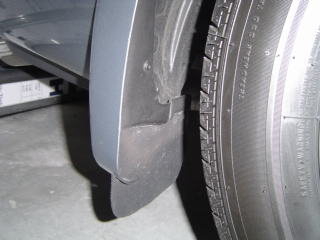
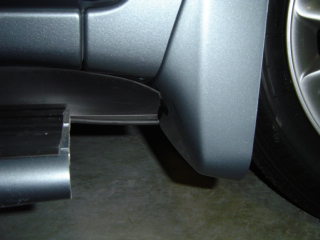
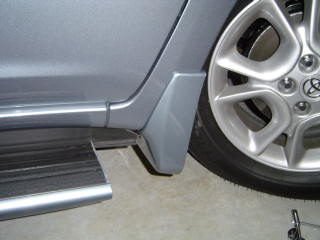
| 13. Now it is time to do the pre-fitting. I turned the
front wheels hard right to give me some room for the right side install. Follow the
included directions to loosely install the mud guard. Our 2006 Sienna
Limited had two 10mm hex screws in the wheel well, so the included kit screw
was not required. The side bolt was covered with preservative and was a
little tough to work with. The install went quick and easy otherwise.
Both photos show the running board back gasket bent over from the mud guard.
I solved that by trimming the excess with a pair of scissors. My next
step is to gauge how much further back onto the running board I need to slide
the resin cap to clear the mud guard. I held the resin cap in position,
slid under the van, and marked the new position on a prong with a felt-tip
marker. (Note that the color match between the GST-painted mud guard and the vehicle is very good.) |
  |
| 14. Here is the back side of the resin cap after I marked it. You can see the thinner area of the prongs that were inside the running board lower channels. I will need to shave down the resin prong about 3/4-inch along its length. I will also need to back cut the prong to remove the resin that is between the prong and the painted portion of the cap to allow the top surface of the running board to slide further inside the cap. The dark spots you see on the prongs are the holes from the retainer screws removed earlier. |
 |
| 15. Here are the modified resin cap prongs. I ground off the extra resin using a small cutoff wheel on an Alltrade Worksmith high-speed rotary tool. My old Dremel tool died just before I did this project and I used a new tool that had much less vibration and was easier to control. |
 |
| 16. Now reassemble everything. Shove the resin cap on as far as you can. Install the mud guard and tighten. Align the cap so that it is positioned correctly. Reinstall the screws to hold the cap in position. (This was a challenge to do upside-down and backwards, but possible.) |
|
During the installation at the port, one of the four screws holding the front resin caps on was rounded out by the installer. From their point of view, that was OK, since they did not subsequently have to remove it. I did. Of course, after a screwdriver, screw extractor, chisel, and Vice Grips failed, I chopped off the stuck resin prong with a carpet knife, cut it off screw with a reciprocating saw, and pounded out the remainder with a punch. That took a little extra time not accounted for above.
This mod was easy to to and took less than an hour for each side. I added the front mud guards and modified the running board caps only because of the SET style of running boards. If you have factory boards, you will not need to do this.
Color-keyed Front Mud Flaps, P/N 00012-20489-09, Painted 8R5/Blue Mirage Metallic (Gulf States Toyota, TRDparts4U)
Color-keyed Rear Mud Flaps, P/N 00012-20489-19, Painted 8R5/Blue Mirage Metallic (Gulf States Toyota, TRDparts4U)
Back to Main Page (the main page includes a link to send me a comment)
This page was last updated 08/12/06